
This embroidered felt heart garland is a simple sewing project that results in a beautifully intricate decoration for your home. You can make it as long or as short as you wish, and choose whatever colours you desire. Read on for step by step instructions, I hope you enjoy making it.

You will need:
- Different coloured felt
- Matching embroidery thread
- Needles; embroidery and all purpose
- Tacking thread
- Sewing machine and two colours of thread
- Scissors
- Pencil
- Trace and tear paper
- Pins
Cut out your felt heart pieces, you’ll need two per heart (one for the back and one for the front). How many of each is up to you and how long you would like your garland to be. I opted for:
- 3 big hearts (6 hearts in all)
- 2 medium hearts (4 hearts in all)
- 2 small hearts (4 hearts in all)

Next, trace off the patterns for each of your hearts onto trace and tear. This time you’ll only need one per heart.

Tack your trace and tear to each felt heart – these are your front pieces.

Now embroider your patterns using three strands of embroidery floss. Follow each of the lines and sew through the trace and tear. The choice of stitch is up to you – I opted for a small back stitch which worked really well. I used contrasting colours at this stage, so the finished embroidery would really pop against the felt.

Remove your trace and tear to reveal your embroidered patterns – lovely!

This bit is optional, but I decided to go back and ‘whip’ my back stitch with a different colour – it gave my hearts a little extra elegance I thought.

Now you will be using the back pieces of each felt heart and sewing them together to make the garland. Begin by lying them out in the order you want to sew them together. Again, how you arrange them is entirely up to you. I opted for a vertical garland, with a pattern of; big, medium, small, big, small, medium, big. The picture probably makes more sense!

Pile them up so the first heart in your sequence is on the top – this way you won’t make any mistakes when sewing together.

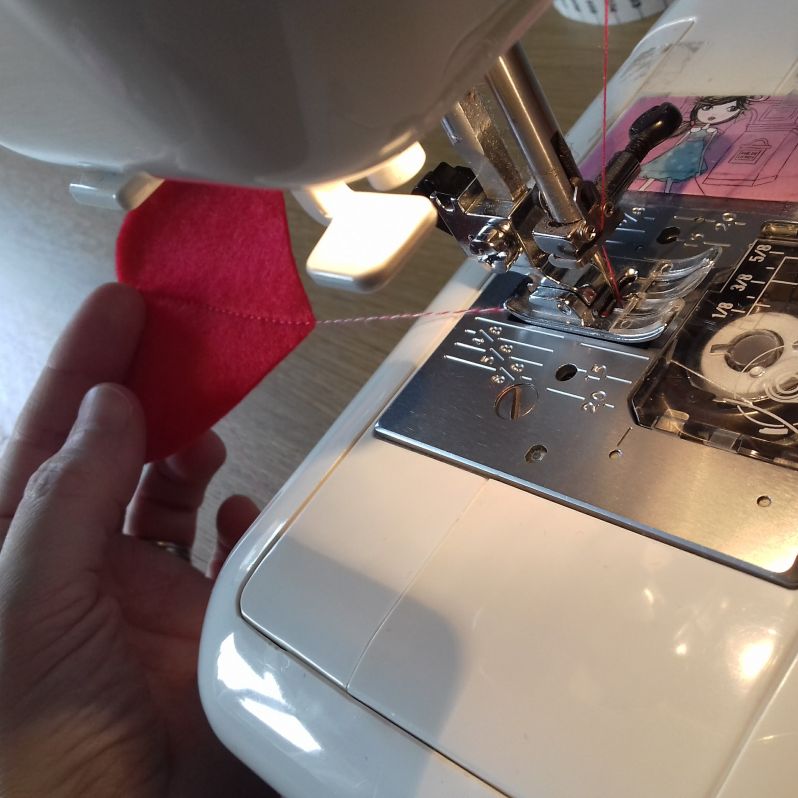
Thread up your sewing machine with a different colour for your top thread and your bottom thread (not essential, but it does add to the decorative finish). Sew ‘nothing’ for a few stitches, until you have a length of thread approximately 10cm – 20cm long (it depends how much of a tail you want). Your thread should look all twisted. Then place your first heart in the sewing machine.

Stitch through the middle of the heart, and when you get to the bottom, keep going for about 4cm – 5cm.
Place your next heart in the sewing machine and repeat…

…again, sewing through the middle of the heart and keep on sewing ‘nothing’ for 4cm – 5cm. Its up to you if you want to measure the gap exactly to keep things even, or if you want your hearts to be arranged with different gaps in between.

Follow these steps until you have sewn all your hearts in place. when you get to the end, keep sewing for a further 10cm – 20cm so you have a tail at the end of your garland.

Tie the thread at the top of your garland into a loop (for hanging).

And tie a simple knot at the bottom of your garland to stop your threads coming undone.

Now, turn all your hearts in the same direction, by making sure the bobbin thread is facing upwards (in my case, I needed to make sure the white stitches were all face up).

Put each corresponding embroidered piece on top of each of your hearts, and pin in place.

Continue until all your hearts have a top and a bottom piece (you might need to use a few pins for your larger hearts).

Now sew each of the pieces together round the edges. I used back stitch again in a matching colour, but this is another area where you can choose how you want your hearts to look; you could try a small running stitch, or blanket stitch, or continue with the whipped back stitch. And you might prefer to use thread that matches your original embroidery, or a further contrasting colour altogether.

And your garland is complete! This would make a really pretty addition to any room, or you might want to opt for festive colours and create a seasonal decoration that comes out once a year. Either way, I hope you have fun making this.

You might also consider signing up for my Creative Sewing Challenge. Its free, and you receive a creative prompt each month to inspire your sewing. Our community is growing every week, and I share a whole load of sewing tutorials linked to each theme throughout the month to give everyone something new to try and to think about. Find out more here, or sign up below – we’d love it if you could join us:
The form you have selected does not exist.
And feel free to share my pin – thank you!


